
An Overview of Proxying to Circumvent Survelliance and Censorship

Introduction
State surveillance and censorship is an increasing concern across the West and became topical again this week with the introduction of the Misinformation Act proposed by the Australian Labor government. The coordinated attack on free speech and civil liberties throughout the West by leftwing governments is the topic of my column in next week’s issue of Liberty Itch magazine. This article is ancillary to that column with a deeper dive into the technologies. This is, broadly speaking, a HOWTO. It is a very broad topic and I’m only going to scratch the surface by describing the methods I use and recommend.
I’ll describe the three mechanisms I use across my devices: encrypted proxies, VPNs and Tor, and their various use-cases. I’ll describe the client software and services I use and for the adventurous wishing to control the solution from end-to-end, provide example configurations. But don’t be discouraged if you’re non-technical! I have solutions for you in the Quickstart section.
A word of warning: there is no such thing as perfect security. Encrypted communication and obfuscation techniques enhance your security posture but do not insulate from attacks that could lead to data exposure or de-cloaking. These approaches will make such attacks significantly more difficult to achieve however, including from attackers who are state actors.
Philosophically my approach is to minimise trust and this is where we compromise. When we exchange data with someone or something across the Internet we are trusting lots of components. The hardware in our devices, the operating system, the applications, the algorithms, the service providers and the person or thing we’re communicating with for example. The objective is to achieve a reasonable balance on the spectrum between security and usability.
A note on performance: these mechanisms involve other systems interposed between you and the person or thing you are communicating with. Instead of a direct connection you’re routing via something else. This necessarily increases latency, so a secondary objective is to minimise it. Latency is a good example of the trade off between security and usability I mentioned in the previous paragraph.
A note on surveillance. That you are using these mechanisms is relatively trivial to detect in most cases. If VPNs are outlawed in your country for example the authorities may be more inclined to visit you if you’re using one. In such a situation you’re better off jumping straight into using Tor which can employ obfuscation techniques such as the OBS4 pluggable transport if you enable it which is more difficult to detect.
Finally, I’m going to break this down into sections with a quickstart guide for the impatient followed by technical descriptions of each solution. There are alternatives to the technologies and methodologies described herein. These are those I use myself and recommend.
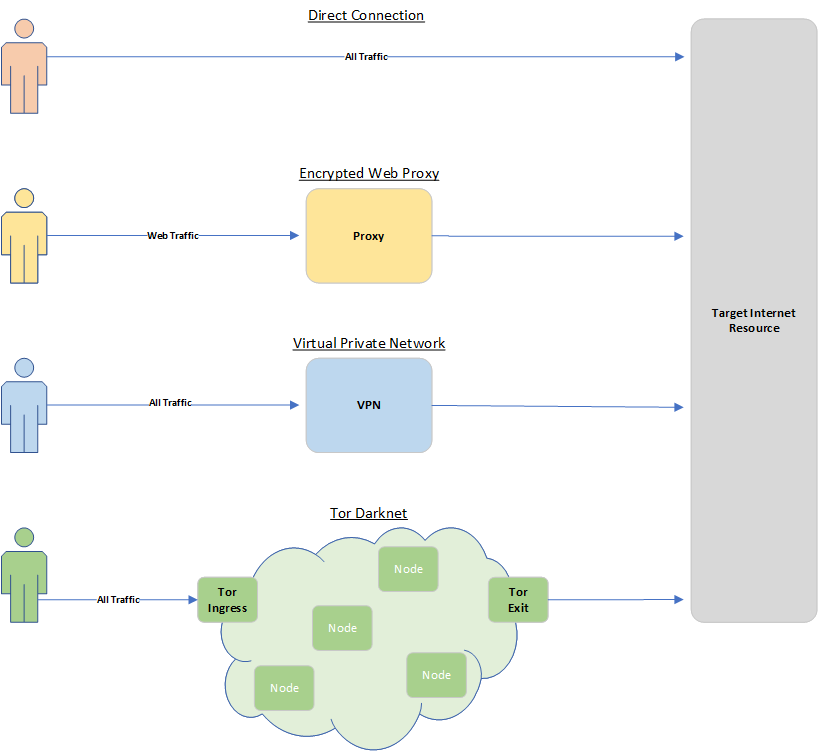
To begin, here’s a conceptual diagram of the various solutions to compare them to the Direct connection you’re probably using currently to help you visualise what we’re endeavouring to achieve.
Quickstart Guide
You’re completely non-technical or perhaps you’re in a hurry and just wants an easy answer. Your use case is either/and:
- Seeking to avoid state censorship and surveillance from the likes of Anthony Albanese and his American eKaren Julie Inman Grant, or general snooping from your Internet Service Provider and other interested parties. You need a VPN.
- In addition to (1) you’re also seeking to obfuscate your location and that you’re using a proxying method, and you’re prepared to accept increased latency to do so. You need Tor.
Install Proton VPN (1)
There are numerous vendors offering VPN services, Proton VPN is the one I recommend because it has a free tier, is fast, is based in Switzerland which has pretty good privacy laws, is easy to use across any device and Proton hosts servers in a variety of countries.
Keep in mind that there is a trust relationship with any VPN service provider. While your government may not be able to decrypt your VPN traffic the service provider can, and they can also collect metadata about the types of traffic you generate when it enters or exits their network. Like any other service provider Proton will abide by court orders.
To install ProtonVPN simply sign up for a free account and download the software onto your devices.
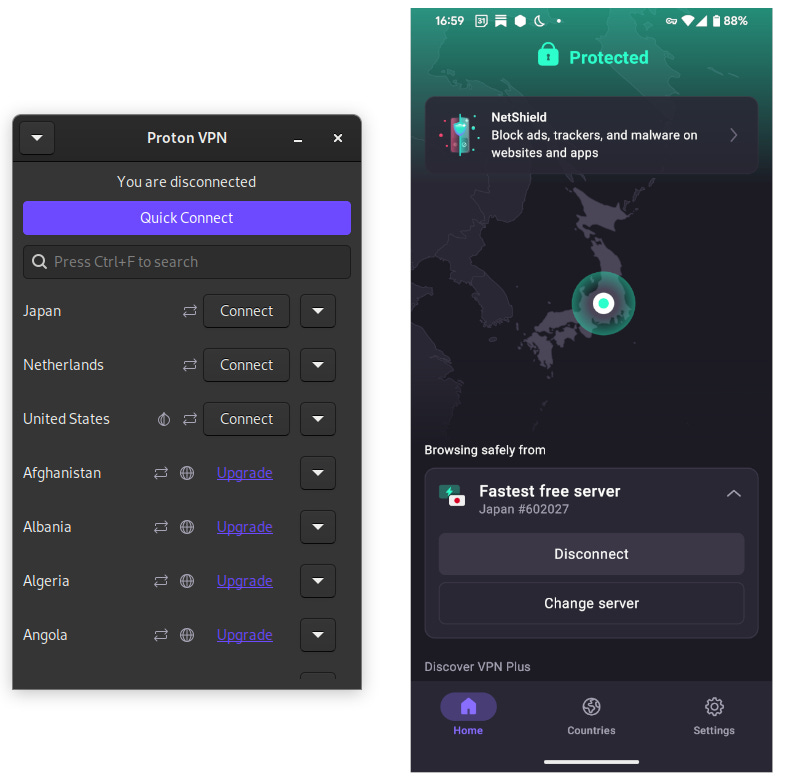
Establishing a VPN is as easy as launching the Proton VPN application, selecting which country you’d like your traffic to emerge from then selecting connect. On mobile devices such as Android and iOS there’s a handy little key symbol to show you that all of your traffic is getting routed via the VPN. You can set Proton VPN to always operate or as needed, and you can tell your device in settings to block any traffic that doesn’t route via the VPN for extra peace of mind.
For users in Australasia a good choice of servers is those within the United States. Because the U.S. is geographically close this minimises the latency of your connections, and because the U.S. has good free speech protections in law. Proton VPN only allows one device at a time to use their free tier. If you have more devices you wish to use concurrently, pay them. You’ll enjoy faster connections too if you do.
Install Tor Browser (2)
Tor is the Darknet or Dark Web you’ve heard scary stories about and it’s true, within the Tor network are some of the most objectionable sites on the Internet. These are URLs inside the top level .onion that can only be accessed with a Tor client, they look like https://something.onion.
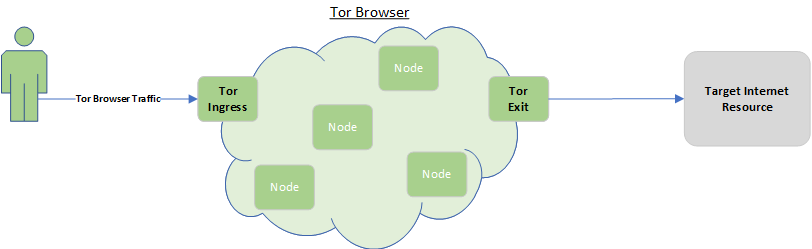
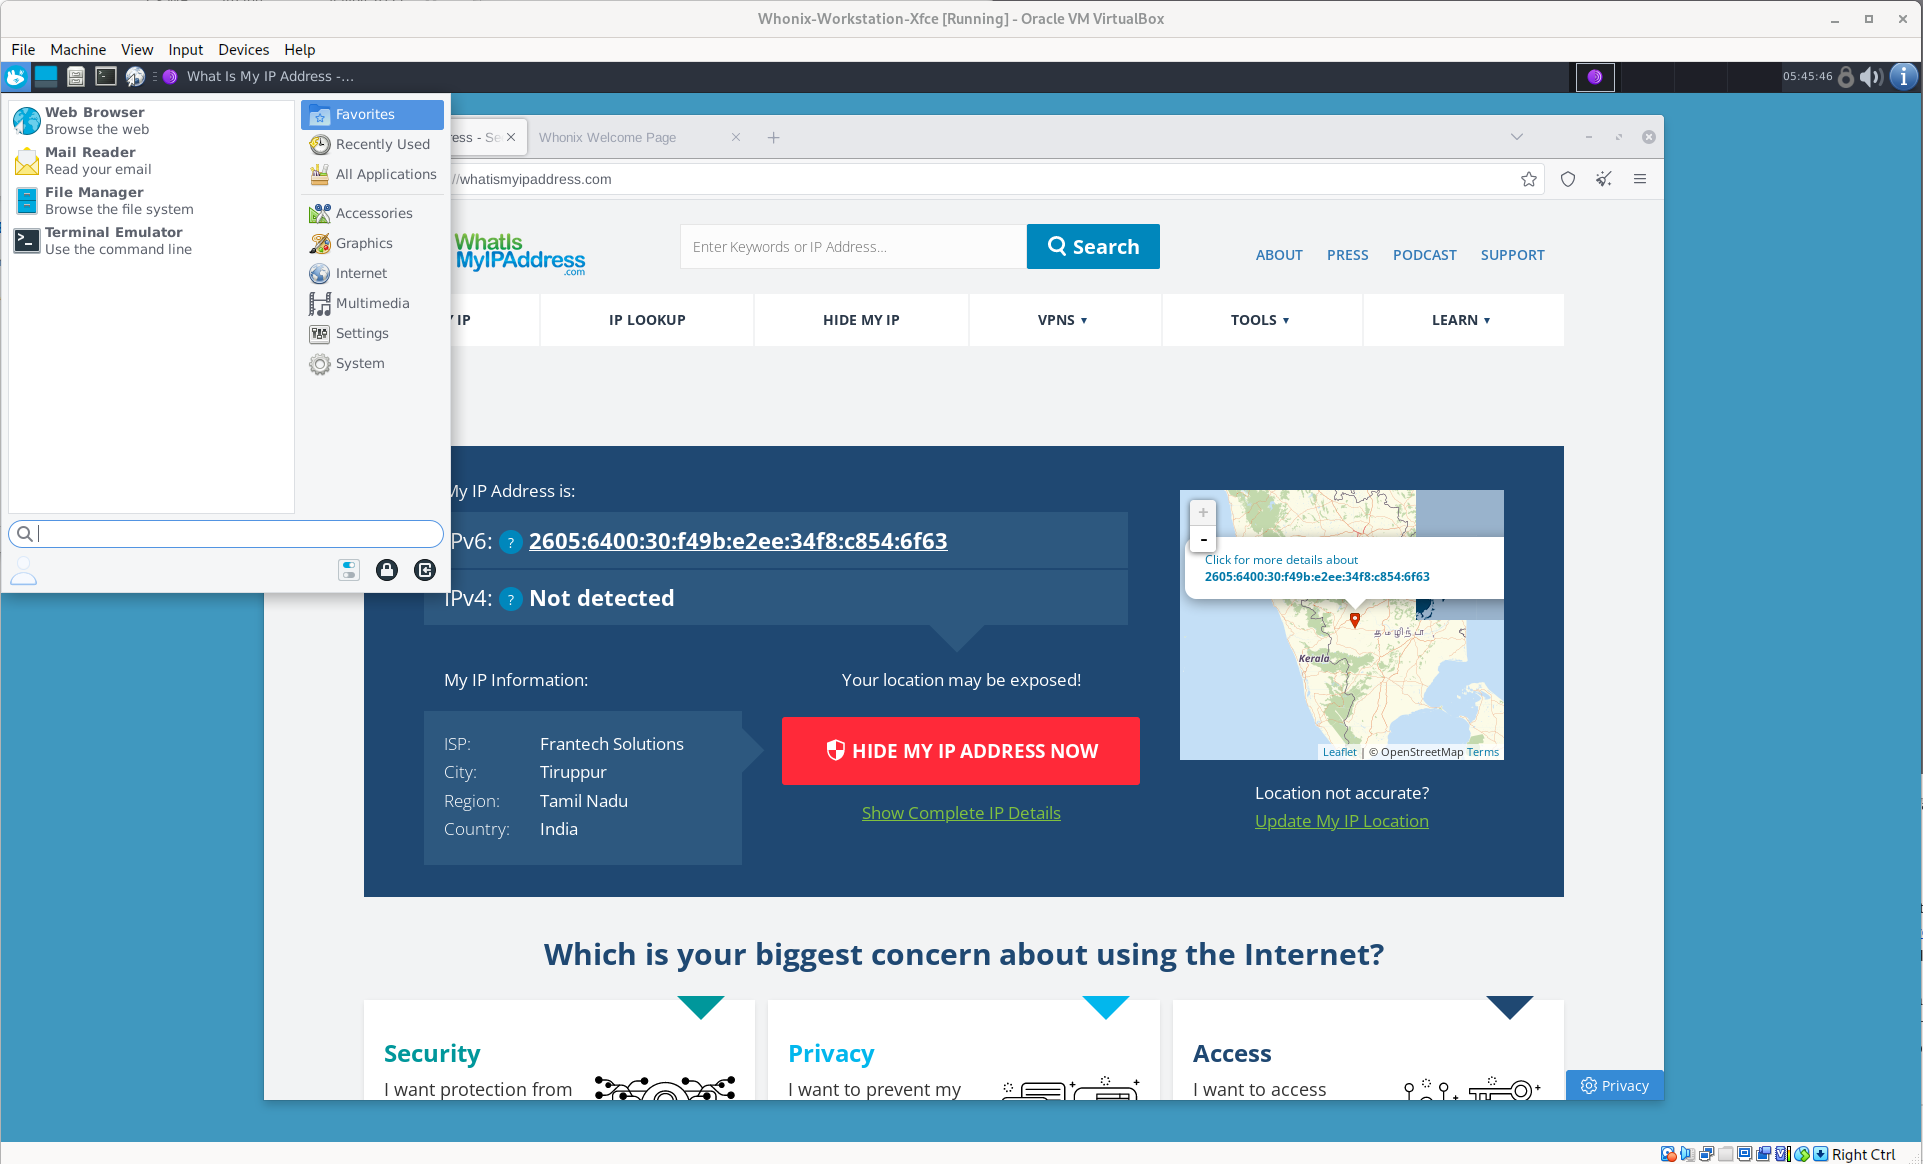
Rather than visiting those .onion sites within the tor network your use case is instead to traverse the Tor network to obfuscate your location. Your traffic enters a Tor Entry Node, bounces around between Intermediary Nodes then emerges back onto the surface Internet via an Exit Node. All of the nodes are aware only of their immediate neighbours so the final destinations are obscured, at least in theory. In practise there are still compromise vectors such as correlation attacks.
The easiest method of using Tor is to download the Tor Browser onto any of your devices except iOS. Because of Apple’s restrictions on their phones and tablets you need to install Orbot and install Onion Browser but essentially the functionality is the same. Sites accessed via the Tor Browser will traverse the Tor network unlike your usual web browser which connects directly to the site.

Because of the extra hops in Tor connections latency is increased. Another issue is that the Tor exit nodes are broadly known and many sites discriminate against traffic emerging from them. This is particularly true of social media sites.
Quickstart Summary
In summary, between these two apps you’re good to go and I recommend them both to everyone, not just those who are non-technical. Like any technology these cannot be 100% relied upon to afford perfect security but as readily-accessible improvements on direct connections. They’re both solid.
Solution Descriptions
This section is a bit more sophisticated. There are alternative technologies and methodologies to those described here but these are the solutions I personally use and how I configure them, and why. I’m not going to delve too far into the explanation of configurations, consider them working examples from which you can conduct further research.
Whonix in VirtualBox
The best method of using Tor is to use a secure operating system dedicated to that purpose such as Tails OS. If you’re running Windows or on an older Intel-based Mac I recommend downloading and installing Tails and launching it from a USB drive instead of your regular operating system. The reason for doing this is proprietary operating systems from organisations such as Microsoft and Apple do nasty privacy-invasive things like telemetry so it’s better to decrease your trust exposure by removing them from the picture.
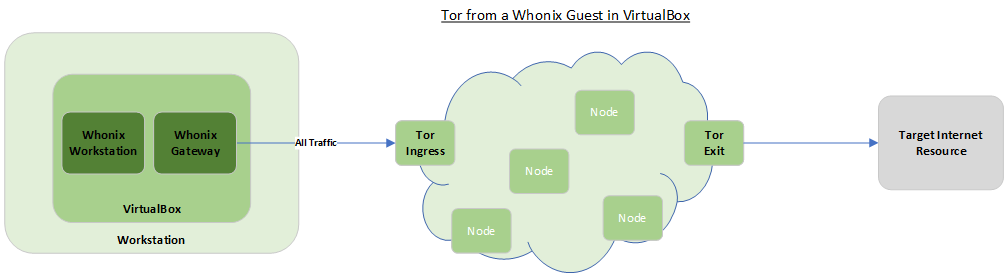
I use Linux on my workstation so have a lot more trust in my operating system. I still want to preserve the segregation between my normal operating environment and a Tor-accessing system though. To do this I run the Whonix secure operating system on top of Linux, inside a VirtualBox virtual machine.
VirtualBox is a common virtualisation solution that is free, as in gratis. It provides a virtualisation layer so you can run guest machines on top of your current workstation that are segregated from the underlying host operating system.
Installing Whonix into VirtualBox is a simple procedure. Download the VirtualBox image then follow the procedure to import the image into Virtualbox.
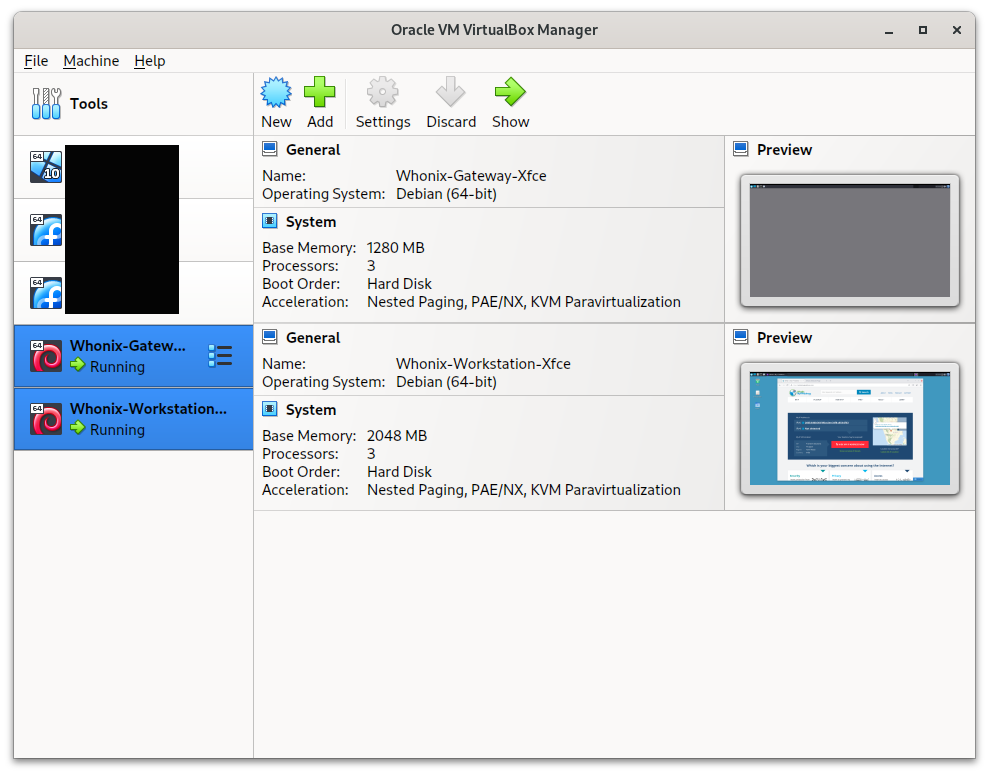
The Whonix image creates two virtual machines, a Gateway and Workstation and both are required for Whonix to operate. Launching them both from within VirtualBox brings up a stripped down, secure version of Linux. It is a fully-featured operating system pre-configured to utilise the Tor network.
Getting into the habit of using virtual machines is not something most users do but it’s a great capability to have even if you don’t use Tor. The facility for example, testing patches on a machine you can destroy and recreate before applying them to the underlying operating system you rely upon to run your hardware is one very worthwhile feature.
WireGuard VPN
While I still use them, I’ve largely moved away from OpenVPN VPNs to WireGuard, sacrificing security for lower latency and portability. There are commercial providers for both that I use too but I favour my own servers where I have control. I install WireGuard on servers in other countries, enhancing my trust as I control both the client and the server and can adjust their behaviours. Here is my default template WireGuard server configuration file:
ListenPort = 51820

# Use your own private key, from /etc/wireguard/privatekey
PrivateKey = <key>

PostUp = iptables -A FORWARD -i wg0 -j ACCEPT; iptables -t nat -A POSTROUTING -o eth0 -j MASQUERADE
PostDown = iptables -D FORWARD -i wg0 -j ACCEPT; iptables -t nat -D POSTROUTING -o eth0 -j MASQUERADE

[Peer]
# Workstation public key
PublicKey = <key>
# VPN client's IP address in the VPN
AllowedIPs = 10.5.5.2/32, 192.168.x.0/24

[Peer]
# Phone public key
PublicKey = <key>
# VPN client's IP address in the VPN
AllowedIPs = 10.5.5.3/32
..and corresponding client configuration file:
Address = 10.5.5.2/32
DNS = x.x.x.x
# Load your privatekey from file
PostUp = wg set %i private-key /etc/wireguard/<key>.key
# Also ping the vpn server to ensure the tunnel is initialized
PostUp = ping -c1 10.5.5.1
PostUp = ip route del default
PostUp = ip route add default dev wg0
PostUp = ip route add x.x.x.x/32 via 192.168.x.1 dev eth0

PostDown = ip route del x.x.x.x
PostDown = ip route add default via 192.168.2x.1 dev eth0

[Peer]
# VPN server's wireguard public key
PublicKey = <key>
# Public IP address of your VPN server (USE YOURS!)
Endpoint = x.x.x.x:51820
# 10.0.0.0/24 is the VPN subnet
AllowedIPs = 0.0.0.0/0
# PersistentKeepalive = 25
Public/private key pairs are generated by the wg utility as in the next command, then manually exchanged between the server and clients:
/bin/wg genkey | tee privatekey | wg pubkey > /etc/wireguard/publickeySomewhere in your servers’s startup scripts you’ll need to enable IP Forwarding in the Kernel. On many Linux distributions the preferred location for this sort of command is the file /etc/sysctl.conf
/bin/echo 1 > net.ipv4.ip_forward=1I use the WireGuard Android app pictured below because it plugs directly into the Android system settings. I understand the Apple iOS app behaves similarly.
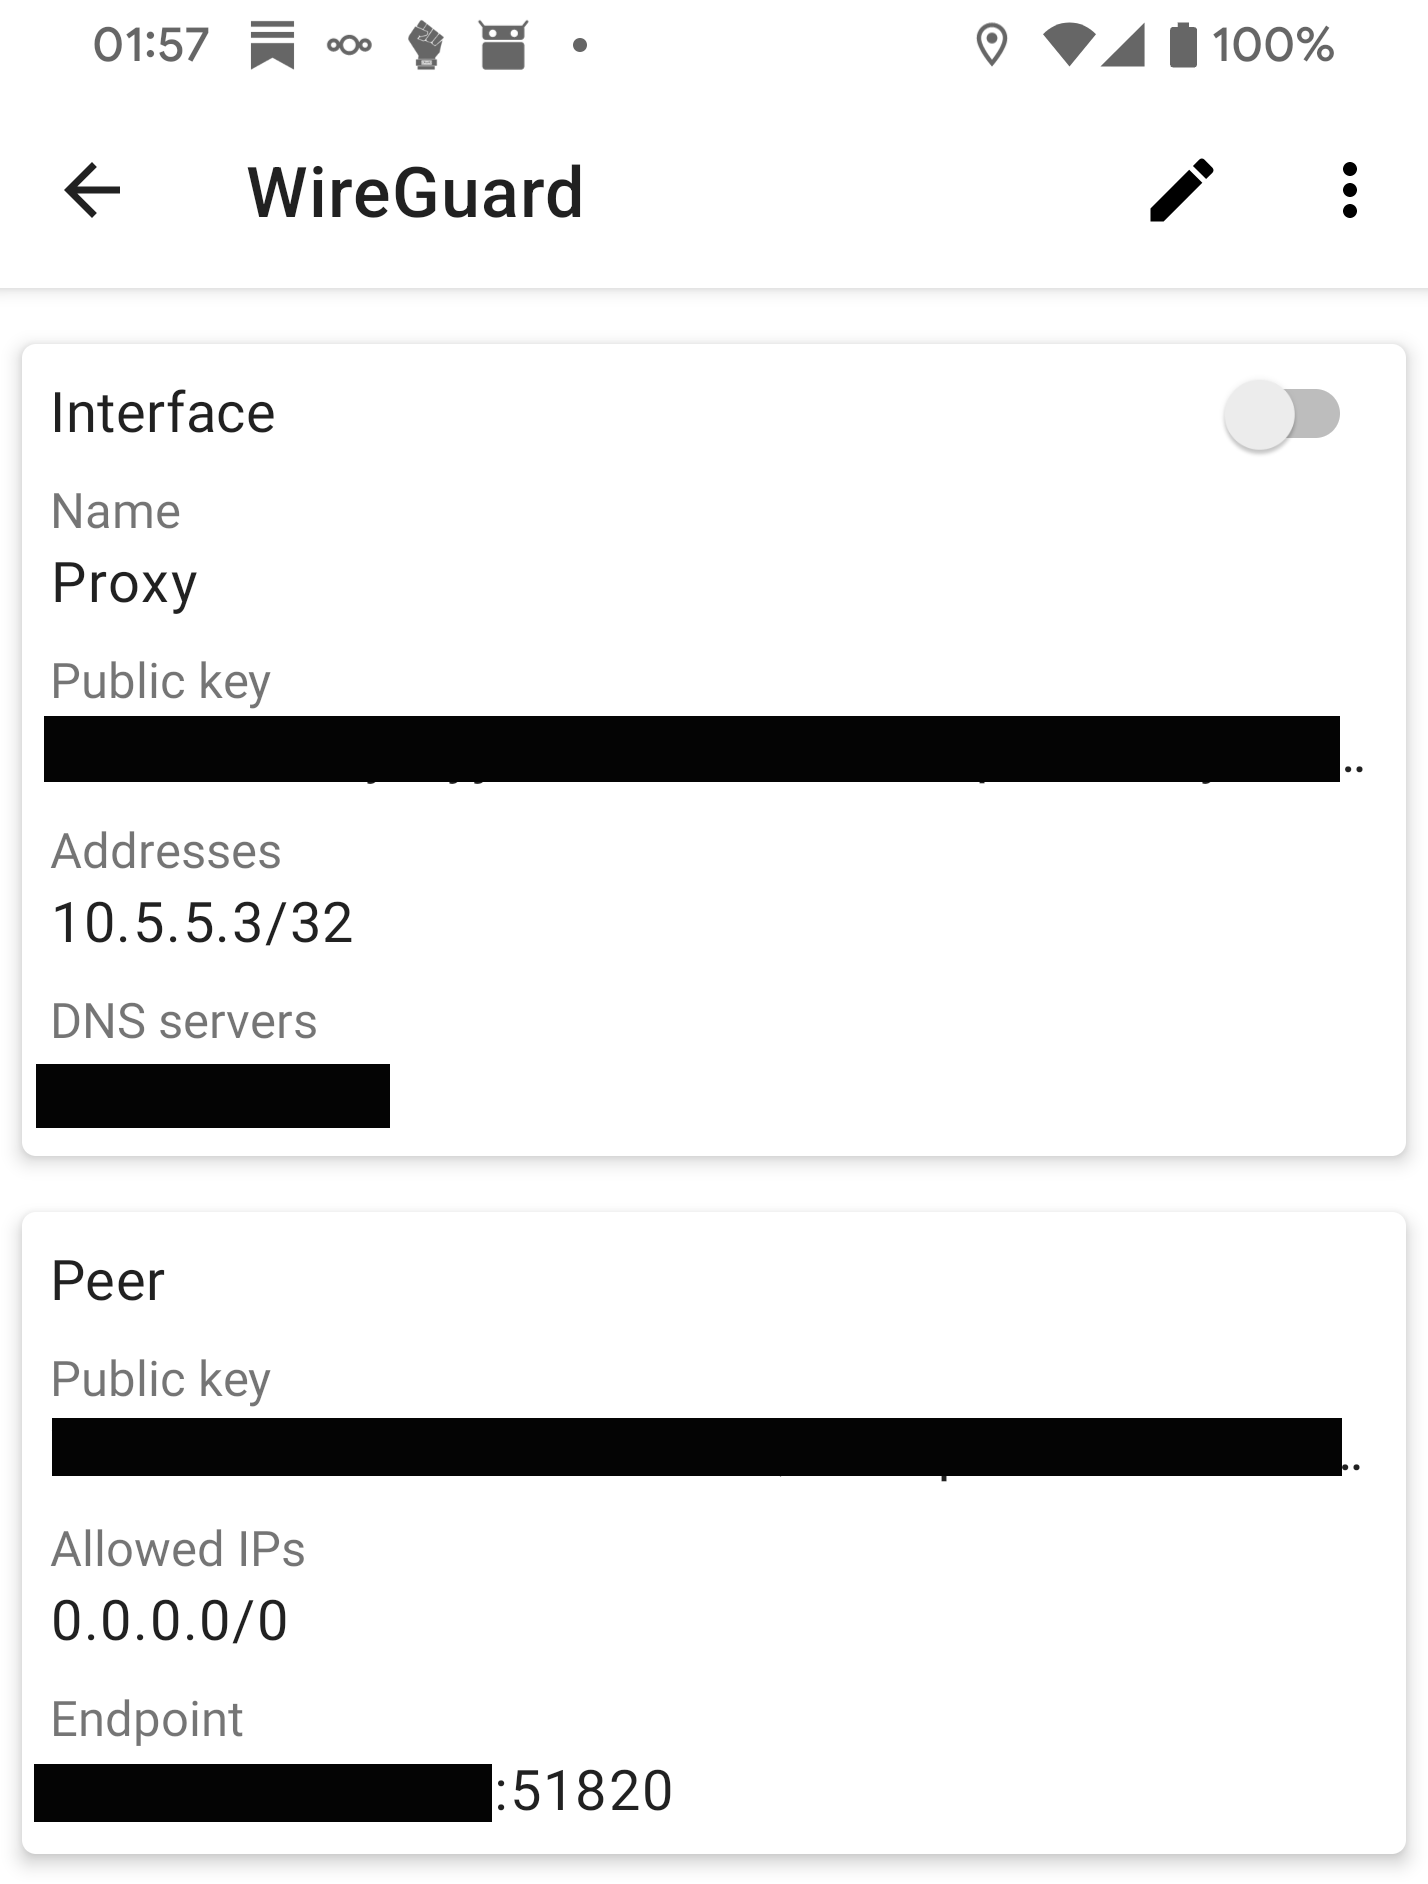
Your mileage may vary. Desktop and mobile operating systems support most types of VPN at the system level and commercial VPN providers provide configuration walkthroughs. As long as you have the capability on your devices you can connect to pretty much anything. The essential difference here is I’m connecting to a server I control so I don’t have to trust a VPN provider.
Squid Proxy

This is the solution I use most often because I can enable/disable it rapidly and I trust it because I control both the client and the server. There are free proxies available but they tend to be slow and -crucially- I can’t control the server’s behaviour. Running a solution myself has the added advantage of allowing me to circumvent overly-restrictive firewall enforcement rules when I’m visiting client sites by operating the server on a non-standard port such as 443.
I use Squid as a proxy server which I install on self-hosted machines in other countries. I violate the HTTP rules to strip identifying information about my web browser and so that traffic appears to originate from the proxy itself rather than my own IP address. I encrypt the client← →proxy connection with HTTPS using a Let’s Encrypt certificate and use the htpasswd utility from the Apache project to manage user credentials. Here’s the squid.conf configuration file:
auth_param basic program /usr/lib64/squid/basic_ncsa_auth /etc/squid/passwords
auth_param basic realm proxy
acl authenticated proxy_auth REQUIRED
http_access allow authenticated
https_port 443 cert=/etc/letsencrypt/[site]/fullchain.pem key=/etc/letsencrypt/live/[site]/privkey.pem
acl manager proto cache_object
acl localhost src 127.0.0.1/32 ::1
acl to_localhost dst 127.0.0.0/8 0.0.0.0/32 ::1
acl internet src all
acl SSL_ports port 443
acl Safe_ports port 80 # http
acl Safe_ports port 21 # ftp
acl Safe_ports port 443 # https
acl Safe_ports port 70 # gopher
acl Safe_ports port 210 # wais
acl Safe_ports port 1025-65535 # unregistered ports
acl Safe_ports port 280 # http-mgmt
acl Safe_ports port 488 # gss-http
acl Safe_ports port 591 # filemaker
acl Safe_ports port 777 # multiling http
acl CONNECT method CONNECT
http_access allow manager localhost
http_access deny manager
http_access deny !Safe_ports
http_access deny CONNECT !SSL_ports
#http_access deny to_localhost
http_access allow localhost
http_access allow internet
http_access deny all
# Squid normally listens to port 3128
http_port 443
hierarchy_stoplist cgi-bin ?
cache_dir ufs /var/spool/squid 2048 16 256
cache_mem 512 MB
coredump_dir /var/spool/squid
refresh_pattern ^ftp: 1440 20% 10080
refresh_pattern ^gopher: 1440 0% 1440
refresh_pattern -i (/cgi-bin/|\?) 0 0% 0
refresh_pattern . 0 20% 4320
# Further Simon Mods
forwarded_for delete
access_log none
cache_log /dev/null
logfile_rotate 0
visible_hostname proxy.local
httpd_suppress_version_string on
#Simon: These are standards breaching and will only work if Squid is compiled with --enable-http-violations
request_header_access From deny all
request_header_access Referer deny all
request_header_access User-Agent deny all
request_header_replace User-Agent Mozilla/5.0 (compatible; MSIE 9.0; Windows NT 6.1; Win64; x64; Trident/5.0)
# Enable for debugging
#access_log /var/log/squid/squid-access.log squid
#cache_log /var/log/squid/squid-cache.log
#cache_effective_user squid
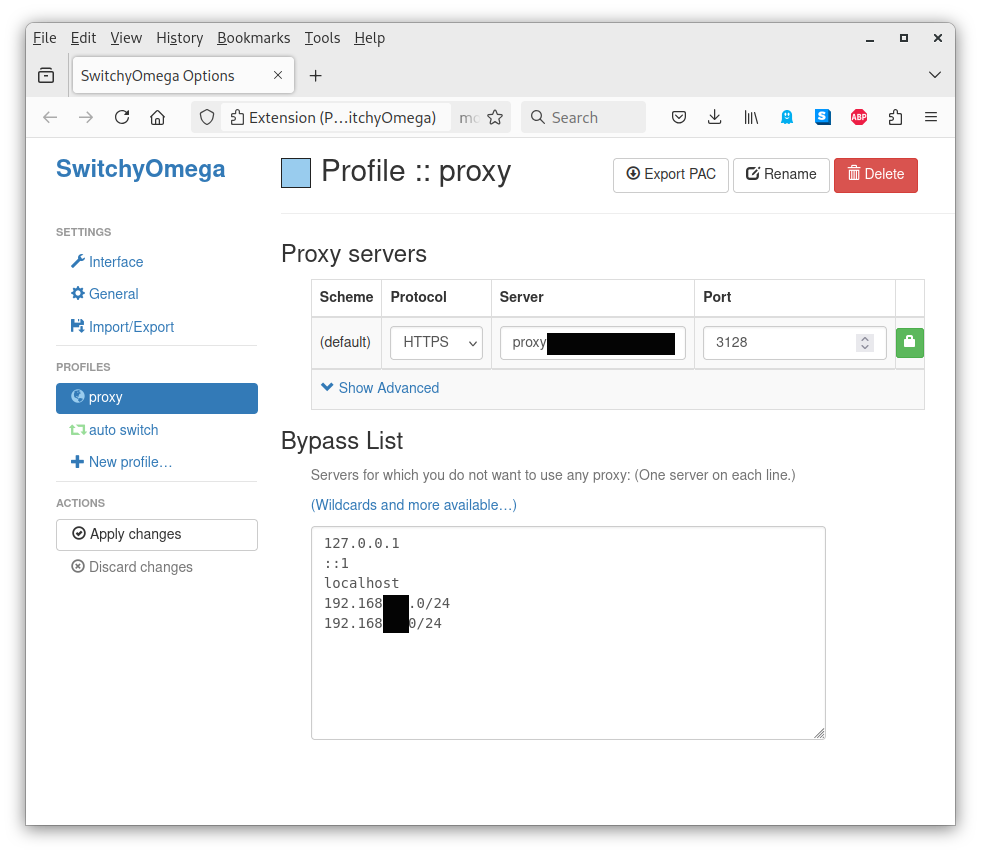
#cache_effective_group squidOn the clientside I use the SwitchyOmega Browser plugin for Chrome and Firefox to give me a handy little button on the toolbar to turn the proxy on and off as required.
Summary
Presented here are approaches and examples for various use-cases of using secure proxies, VPNs and Tor for beginner and advanced users, across various devices. It is by no means definitive and there are alternative technologies, approaches and methodologies. Moreover these do not in themselves afford perfect security and I have not touched at all upon ancillary subjects such as metadata (e.g. browser cookies and DNS), operational security behaviours and attack vectors.
Finally, please keep in mind these approaches apply to transport. Securing your data at rest at either end of the connection necessitates different security mechanisms and behaviours.